Cut-off switch RFX Race Series - OEM replica
| BRANDS | RFX |
|---|---|
| EAN | 5056070604797 |

PROMO
was €21.00 Special Price €19.12
SKU
1128592
Shipped within 48h
| Brand | Cylinder | Model | Year | Caractéristique |
|---|---|---|---|---|
| KAWASAKI | 250 | KX 250 F | 2004 | |
| KAWASAKI | 250 | KX 250 F | 2005 | |
| KAWASAKI | 250 | KX 250 F | 2006 | |
| KAWASAKI | 250 | KX 250 F | 2007 | |
| KAWASAKI | 250 | KX 250 F | 2008 | |
| KAWASAKI | 250 | KX 250 F | 2009 | |
| KAWASAKI | 250 | KX 250 F | 2010 | |
| KAWASAKI | 250 | KX 250 F | 2011 | |
| KAWASAKI | 250 | KX 250 F | 2012 | |
| KAWASAKI | 250 | KX 250 F | 2013 | |
| KAWASAKI | 250 | KX 250 F | 2014 | |
| KAWASAKI | 250 | KX 250 F | 2015 | |
| KAWASAKI | 250 | KX 250 F | 2016 | |
| KAWASAKI | 450 | KLX 450 | 2008 | |
| KAWASAKI | 450 | KLX 450 | 2009 | |
| KAWASAKI | 450 | KLX 450 | 2010 | |
| KAWASAKI | 450 | KLX 450 | 2011 | |
| KAWASAKI | 450 | KLX 450 | 2012 | |
| KAWASAKI | 450 | KLX 450 | 2013 | |
| KAWASAKI | 450 | KLX 450 | 2014 | |
| KAWASAKI | 450 | KLX 450 | 2015 | |
| KAWASAKI | 450 | KX 450 F | 2006 | |
| KAWASAKI | 450 | KX 450 F | 2007 | |
| KAWASAKI | 450 | KX 450 F | 2008 | |
| KAWASAKI | 450 | KX 450 F | 2009 | |
| KAWASAKI | 450 | KX 450 F | 2010 | |
| KAWASAKI | 450 | KX 450 F | 2011 | |
| KAWASAKI | 450 | KX 450 F | 2012 | |
| KAWASAKI | 450 | KX 450 F | 2013 | |
| KAWASAKI | 450 | KX 450 F | 2014 | |
| KAWASAKI | 450 | KX 450 F | 2015 |
Description
Tonnycat vous propose :
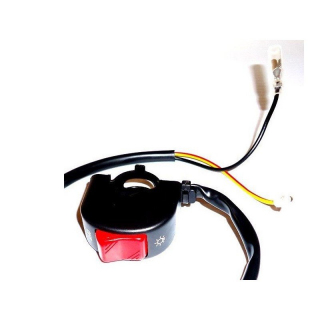
Cut-off switch RFX Race Series - OEM replica de RFX
The RFX Race Series circuit breakers are OEM replacement parts.
Complete with the same fittings, fastenings, connectors, and cable lengths as the original part.
Available for a wide variety of motorcycles.
Features:
- OEM replacement
- Accepts all original connectors
- OEM cable length
Installation instructions:
- Start by removing the front plate.
- Carefully cut the cable ties that hold the start and stop switch cables on the handlebar, then unscrew the clamps and let them hang.
- Locate the switch connector on the motorcycle, it is often close to the steering column on the frame but can sometimes be found under the tank.
- Detach the connector and remove the switch, noting the wiring path.
- Clean the connector with an electrical contact cleaner.
- Securely attach the new switch to the handlebar in the desired position.
- Route the wires as for the old switch and assemble the connector.
- Check that the wires are not taut by turning the handlebar to full extension, adjust if necessary.
- Reinstall the cable ties if possible by positioning the cables behind the handlebar to avoid damage from debris.
- Put your front plate back in place.
| BRANDS | RFX |
|---|---|
| EAN | 5056070604797 |

Soyez le premier à poser une question sur ce produit !